Setting Up the Rero Board
The Reverb Robotics Single Board Computer is based on the raspberry pi compute module and comes preinstalled with Rero Core. The board requires only the connection of power, microphones, and networking before it is ready to use.
Hardware Overview
The Rero Board comes equipped with a connection for up to 4 PDM MEMS microphones, a connector for stereo speaker output (up to 10 watts), a 3.5mm audio output jack, and ethernet (including Power-over-Ethernet support). The details are outlined in the illustration below. 
It is important to only use a 5V/4A power supply when using the barrel jack connector, in order to not damage the board. Additionally, if mounting the board and/or microphones against metal or conductive parts, ensure a layer of insulation between any exposed pins/vias/etc to prevent shorts and electrical damage.
Microphone Wiring
PDM MEMS microphones are wired to the two sets of header pins located on the left side of the board, as shown in the following diagram. Two microphones are wired to each connector, with the L/R pin set to low for the left mic and high for the right mic of each pair.
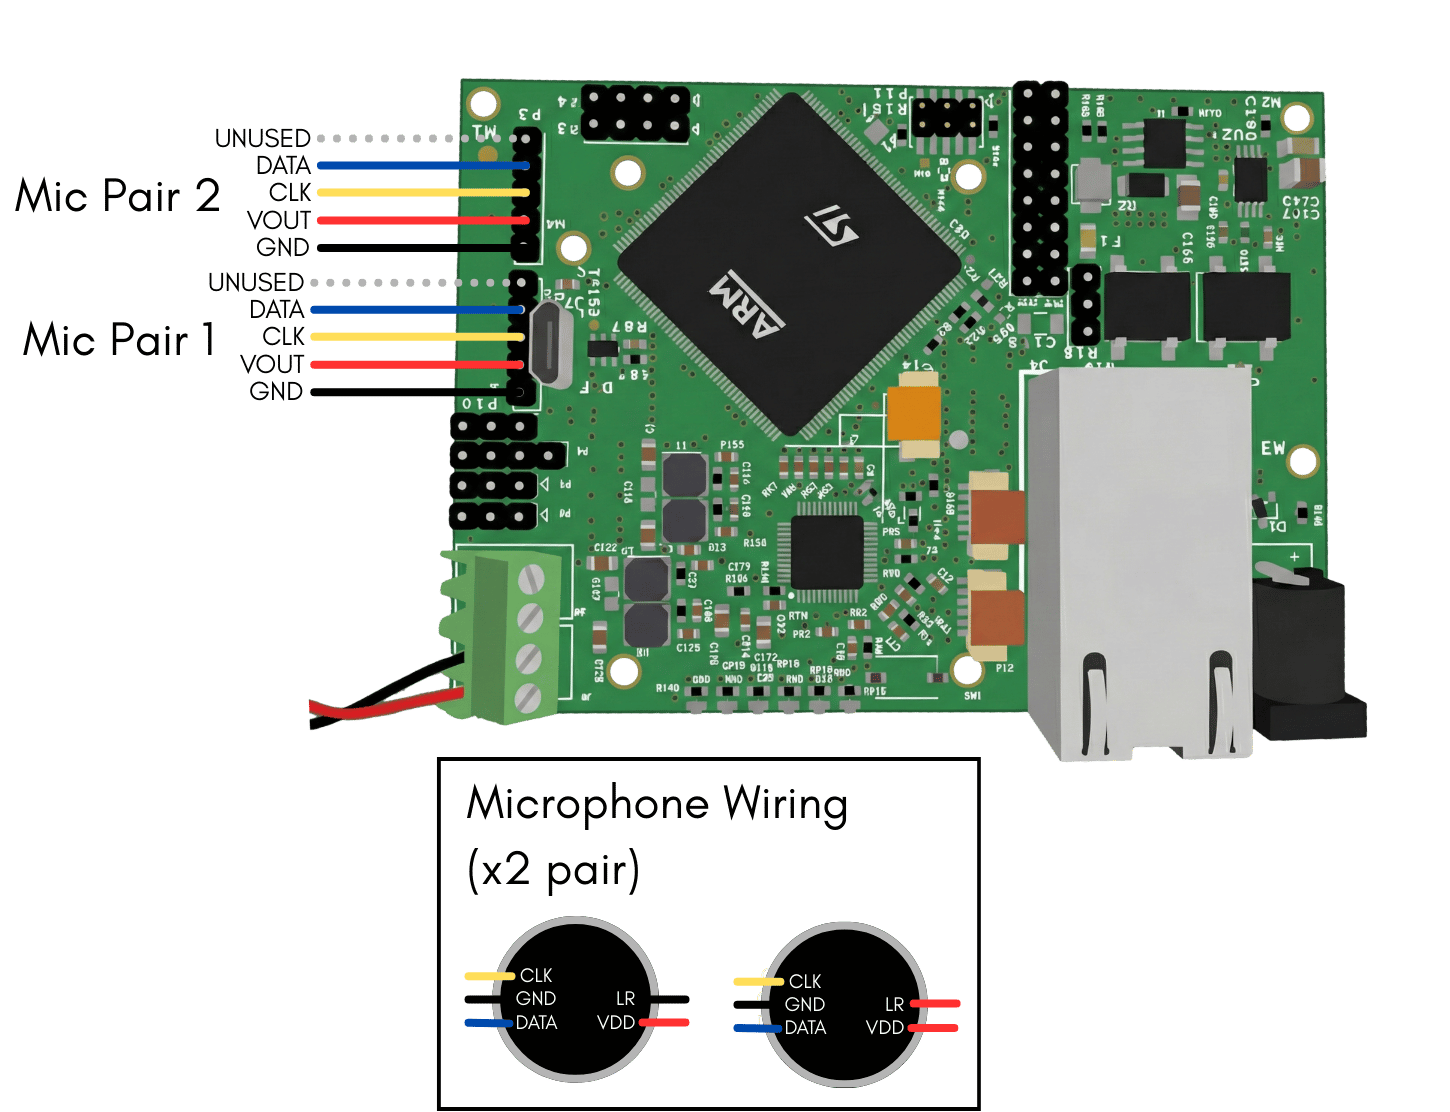
Ensure the microphones are wired correctly before powering up the board to ensure the board is not damaged.
Configuring Networking and Logging into the Board
The Rero Board will attempt to obtain an IP address automatically via DHCP when connected to a network via its Ethernet port. This port supports Power-over-Ethernet (PoE).
Finding the Rero Board on the Network
To log into the board via SSH, you must first determine its IP address on your local network.
- Direct Connection/Shared Internet: If you are connecting the Rero Board directly to your computer (e.g., to share an internet connection over Ethernet), your computer will likely assign a local IP range (e.g.,
192.168.x.x). You can scan this local IP range to find the board. - Using
nmap: A helpful tool for scanning your network isnmap. Run it on your local subnet (e.g.,nmap -p 22 192.168.1.0-255, replacing the IP range with your own) to find active devices. Look for a raspberry pi device with SSH open (port 22). - Nmap can also be used to find the board on your local lab network, but be careful to follow IT procedures at your institution if scanning the network.
Logging In
Once the IP address is known (substitute <RERO_IP> with the actual address), log in using SSH:
ssh rero@<RERO_IP>
The default credentials for the board are:
- Username:
rero - Password:
rero123.123
Setting a Static IP
For a stable lab setup, it is highly recommended to assign a static IP address to the Rero Board to ensure a consistent connection. Since the board runs the latest version of Raspbian (Raspberry Pi OS), the process for setting a static IP is the same as the standard Raspbian configuration. Refer to a guide here for detailed instructions on configuring a static IP.
Next Steps
You are now ready to start using the board. The Rero Board comes with Rero Core preinstalled and set up as a system service that starts on boot, so you are ready to test out the board’s functionality using the CLI Tools, or start working with the board using ROS. If you are interested in changing the configuration of the board (such as defining a custom vocabulary for speech recognition), details on reconfiguring Rero Core can be found here.